Thursday, 22 April 2021

Automate Azure App Service access restriction configurations using Service Principal and Azure Management API

Azure App Service provides a way to configure access restriction policies to allow/deny network access on workloads (Azure Function App/Web App etc) hosted on the App Service. This policy can be set to allow/deny access based on 

1) IP addresses

2) Azure Virtual Network subnets. 

The detailed description of this capability is available in the Microsoft Documentation of this feature.

By setting network access restrictions, you can ensure that only the consumers with specific IP addresses or Azure Virtual Networks are allowed to access the App service.

In the below example, we have a API built using Azure Function App that can be consumed by several teams/business units within an organization. We have set access restrictions on the API app to allow specific IPs and Azure Virtual Networks.


There are a few considerations in order to configure these access restrictions through the Azure portal.

1) The user account that configures these access restrictions must be assigned specific privileges on the consumer's Virtual Network. Either 'Network Contributor' role can be assigned to this account OR to ensure the least privileges, a custom role with the below permissions can be assigned

  • Microsoft.Network/virtualNetworks/subnets/joinViaServiceEndpoint/action
  • Microsoft.Network/virtualNetworks/subnets/read 
  • Microsoft.Network/virtualNetworks/read


This means that individual user accounts from the API's development/operations team will have access to consumer's VNETs.

2) The user account must continue to have access on these virtual networks in order to be able to make any changes to the access restriction configurations. For example, if the access of a user account configuring these policies is removed from the "Cloud COE" VNET, an attempt to add or remove a policy fails.To get around this issue, the VNET from which user's access was revoked must be removed from the configuration first.

The failure message can be seen in detail through the Azure CLI

az webapp config access-restriction remove -g SharePointSiteProvisioningAPI -n SiteProvisioningAPI --rule-name "Cloud COE IP-1"


The client 'OpsUser@<domain>.onmicrosoft.com' with object id '<objectID>' has permission to perform action 'Microsoft.Web/sites/config/write' on scope '/subscriptions/<subscriptionID>/resourceGroups/SharePointSiteProvisioningAPI/providers/Microsoft.Web/sites/SiteProvisioningAPI/config/web'; however, it does not have permission to perform action 'joinViaServiceEndpoint/action' on the linked scope(s) '/subscriptions/<subscriptionID>/resourceGroups/CloudCenterOfExcellenceRG/providers/Microsoft.Network/virtualNetworks/CloudCOE-Vnet/subnets/CloudCOE-Subnet-SiteProv' or the linked scope(s) are invalid.


 Automate access restriction configurations using a Service Principal :

The use of individual user accounts for configuring access restriction can be avoided by automating this operation using a Service Principal identity. One way to achieve this is by Azure PowerShell or Azure CLI. However, NOTE : that if you wish to whitelist a Virtual Network that lies in a different subscription, this isn't supported in Azure CLI at the time of writing this blog post

Till the time (if and when ?) cross subscription whitelisting is available in Azure CLI/Az PowerShell, this can be achieved using the Azure Management REST API. 

The script below authenticates to AAD using a Service Principal, which has been assigned a custom RBAC role (with permissions explained above) on the API consumer's Virtual Networks and uses the Azure Management API to update 'ipSecurityRestrictions' in web site's config. The Script is intended to be used on PowerShell Core with latest Az module version to enable the use of 'Get-AzAccessToken'  command.

Configure the '$ipRules' and '$vnetRules' in the script to configure access restrictions.


Friday, 27 March 2020

Secure PowerShell Azure Function APIs through API Management and custom roles - Part 2

The first part of this post can be found here : https://vipulkelkar.blogspot.com/2020/03/secure-powershell-azure-function-apis.html

To secure the API we built in the previous post, we will create and configure an API management instance. Create a new one through Azure portal and import the Azure Function App in API management, some guidance provided here : https://docs.microsoft.com/en-us/azure/api-management/add-api-manually


API Management allows us to configure access restriction policies. Since we want to restrict access to the APIs based on specific roles, we will configure a Validate-JWT policy that validates the 'roles' claim in the access token: https://docs.microsoft.com/en-us/azure/api-management/api-management-access-restriction-policies#ValidateJWT

Let's configure a policy for '/Applications' endpoint. The client SPN 'MyOrg-API-Consumer' from has access to the '/Applications' endpoint. So we will validate that the access policy works when this endpoint is hit. Then we will also verify the case that  'MyOrg-API-Consumer-Devices' SPN cannot hit the '/Applications' endpoint since it only has access to '/Devices'

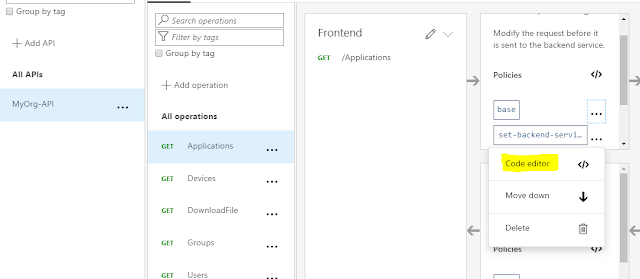
In the API management instance, we navigate to our API and select the /Applications endpoint. From the Inbound processing section, a new policy can be added through the 'Add Policy' button.


This opens a form to configure the policy. We can also choose to add the policies using the code editor. On the base policy which is added by default, select the code editor.


We start off by putting the validate-jwt policy. Just below the set back-end service policy, we configure the validation for the 'roles' claim in the access token received in the request

 <validate-jwt header-name="Authorization" failed-validation-httpcode="401" failed-validation-error-message="Unauthorized. You do not have the assigned role to access this endpoint.">
            <required-claims>
                <claim name="roles" match="any">
                    <value>Users</value>
                </claim>
            </required-claims>
 </validate-jwt>

Now, from the 'TEST' tab, try to call the '/Applications' API endpoint. Make sure you have acquired an access token using the 'MyOrg-API-Consumer' SPN and add it to the header. API management allows us to setup OAuth and use the developer portal which has the ability to get access tokens : https://docs.microsoft.com/en-us/azure/api-management/api-management-howto-oauth2

However, in this case i have manually supplied the access token in the header by fetching it through Postman


This call fails with 401 Unauthorized however we expected the call to succeed. To dig further, API Management has error handling feature which can be added to the policy code to get the details of the error and troubleshoot : https://docs.microsoft.com/en-us/azure/api-management/api-management-error-handling-policies
After error handling didn't help and weirdly the test threw a  500 Internal Server Error.

Turned out that the OpenID specification url 'openid-config url' had to be supplied to the policy for it to work.  This value specifies the path to the OpenID v2.0 config file. You can view the config by opening the file in browser.

https://login.microsoftonline.com/[Tenant-ID]/v2.0/.well-known/openid-configuration

Access token and token validation concepts are detailed in reference documentation : https://docs.microsoft.com/en-us/azure/active-directory/develop/access-tokens#validating-tokens

Trying out another test failed however, this time the error details were visible since we have added the error tags in the policy.


Issuer validation failed. Issuer: 'https://sts.windows.net/[Tenant-ID]/'. Did not match: validationParameters.ValidIssuer: '' or validationParameters.ValidIssuers: 'https://login.microsoftonline.com/[Tenant-ID]/v2.0'

This is because with the OpenID config file set, the policy expects a v2.0 token coming through. The token that I had acquired through Postman was for v1.0 token endpoint.

This can be traced back to the "accessTokenAcceptedVersion" property in the app registration that registers our API. By default it is set to 'null' which means that when a token is fetched with the url of our API in audience, a v1.0 token will be issued: More details here : https://docs.microsoft.com/en-us/azure/active-directory/develop/access-tokens

So we let our policy know, that we will be using v1.0 tokens. The final policy setup looks like below with the issuer check in place.
(replace the [tenant-id] with your tenant ID in the code)


The api test call works and we get a OK response.

Similarly a TEST with MyOrg-API-Consumer-Devices access token which does not have access to '/Applications' API, results is 401 Unauthorized. To make sure our policy is working, we can validate that the message we get in 401 response is the one we configured in the policy.

The direct calls to the back end Azure function API can be secured to that it accepts calls only through API management instance. Here is some documentation on how to achieve that : https://docs.microsoft.com/en-us/azure/api-management/api-management-howto-mutual-certificates

Monday, 23 March 2020

Secure PowerShell Azure Function APIs through API Management and custom roles - Part 1

Azure Functions enable us to quickly build and publish APIs and also secure it using Azure Active Directory. While it is fairly straight forward to implement role-based access control within the custom API code using ASP.net and middle ware, it could be tricky in PowerShell Azure Functions. This involves extracting the roles claims from the access tokens and validating it in the code when the PowerShell API endpoint starts execution - not that this is too complex to implement.

Another way could be to use API Management to configure access policies and secure the endpoints based on roles. This approach can be easier if you are already using API management's other features for your custom API.

Part 2 of this Post can be found here : https://vipulkelkar.blogspot.com/2020/03/secure-powershell-azure-function-apis_27.html

Background

Here is our scenario :  Our custom API exposes a set of endpoints which provide information related to our organization. Every API endpoint must be accessible through a unique permission level. The client SPNs/Apps must have specific application permission assigned to be able to acquire application tokens and access the endpoints

- /Applications
- /Devices
- /Users
- /Groups


When an Azure Function  is secured using Azure AD, the identities that can authenticate to Azure AD can access it by default. Which means that any SPN/App, would be able to access the API endpoints in Function App by default when Azure AD login is configured.

This is what we want to stop and create ROLES so that the SPNs/Apps need to be specifically provided application permission to be able to access the endpoints.

Secure PowerShell Core Azure function API :

We will work with a very simple Azure Function called "MyOrg-API" which exposes a set of GET endpoints.

Our sample API URL is : https://myorg-api.azurewebsites.net


We have created an Azure AD App registration which represents our API.


The APP ID URI must be the base URL of our Azure Function : https://myorg-api.azurewebsites.net


Next step is to secure the API Azure Function. Navigate to Function App -> Platform features -> Authentication/Authorization

Configure the auth setup. The Client ID is the id of the app that we registered.


Now if you access any endpoint from the Azure function in a browser, you will be prompted for authentication and on supplying your credentials, you will get a response from the GET endpoint.

Lets see how that works with an SPN. Create a new SPN in your AAD. If you have Az PowerShell module the below command will craete an SPN

Connect-AzAccount -Tenant <Your-Tenant-ID>

New-AzADServicePrincipal -DisplayName "RandomSPN" -Scope $null -Role $null

Create a Secret for the SPN and try to call the API through postman/logic apps http action - the call goes through since SPN is able to authenticate with AAD.


Configure Roles:

A way to stop this is by defining ROLES and validating within the API whether the caller has the specified role to carry out a specific API operation.

Lets start by creating roles in the App registration which secures our API.

Navigate to the App registration -> Manifest. In the 'appRoles' property, define custom roles. Create an object for each endpoint we defined at the start of this post. Below sample explains the role confg for /Applications endpoint
Replace the 'id' value by a GUID


Now that we have configured the custom roles, we will create two consumer SPNs to demonstrate our setup. Access your SPN from the App registrations and navigate to 'API Permissions'.  Search for our custom API.


1) MyOrg-Consumer-SPN :

This SPN will be able to access Applications, Users and Groups endpoints. Provide the permissions and Grant consent.


2) MyOrg-Consumer-SPN-Devices :

We have another consumer SPN which will have access to only /Devices endpoints


In the next post we will look at configuring API management to make sure that only the SPNs that have been given a role can access the respective endpoint.
https://vipulkelkar.blogspot.com/2020/03/secure-powershell-azure-function-apis_27.html


Monday, 21 January 2019

Update navigation nodes in SharePoint site using PnP-PowerShell

Recently I wanted to update a quick launch link's TITLE and URL in a lot of modern SharePoint team sites. I thought PnP PowerShell would be the best way to loop through the sites and update the links.

You can easily add and remove navigation nodes using PnP-PowerShell by using commands (Add-PnPNavigationNode and Remove-PnPNavigationNode) however, there is no direct command to update it at the time of writing this. Yes, I could add a new link and delete the older one that needs to be updated, but that would change the order of the link in quick launch which I did not want.

So here is a very simple approach to update the navigation link. Get-PnPNavigationNode returns all the links in the navigation.


So fetch the navigation node by filtering on the "Title" and update the required properties. ExecuteQuery on the context of the Nav node.


Tuesday, 30 October 2018

Get File content action in Microsoft Flow using File Identifier and File Path

I was working on a HTTP Triggered Flow that copies a file from one document library to another. I wanted the source and target path of the file copy operation to be dynamic and could also be different site collections, so these paths were sent through the HTTP request body. However, the Flow threw errors that it could not find the Source file. This was because I was using the source file path as-is in the "Get File Content" action.


The Flow that I was building would look something like this


The request body is parsed using the Parse JSON action and the values can be used in the "Get File Content" and the "Create file" actions.

Ideally when the source and target are pre-determined, the flow looks like below.


Now in the Get File content action, the File Identifier is not the same as File path although it looks like it in the UI. We will see this in the upcoming steps.

The request body that we have sent through the HTTP request looks like below. It has all the data that we have used in the two file actions above.


So now we use these values in the "Get File content" and "Create file" actions.


Simple ! but when I execute the Flow, I keep running into an error in the Get File Content action.

 "message""The response is not in a JSON format.",
 "innerError""The resource you are looking for has been removed, had its name changed, or is temporarily unavailable."


To check the "identifier" value, I used the "Get Item" action


So with the identifier value, the Flow worked without any error ! The output of the Compose action shows the identifier value


If you notice the "Get File Content" action, we need to input the "File Identifier" and that is why the path that we used from request body did not work.

Then I discovered there is already an action - "Get File Content using path" to directly use the path that we are getting in the HTTP request body.


OR

Since the identifier is encoded, we can encode the "SourceFileUrl" that we have from the request body and use it in the Get file content action. 

However if you notice, the identifier returned by the "Get Item" action, the spaces are encoded as "%2b" ie "+" and "encodeUriComponent" expression will simply encode the spaces as %20

Using the Get File content using path action is clearly simpler option


encodeUriComponent(body('Parse_JSON')['SourceFileUrl'])