Tuesday 30 October 2018

Get File content action in Microsoft Flow using File Identifier and File Path

I was working on a HTTP Triggered Flow that copies a file from one document library to another. I wanted the source and target path of the file copy operation to be dynamic and could also be different site collections, so these paths were sent through the HTTP request body. However, the Flow threw errors that it could not find the Source file. This was because I was using the source file path as-is in the "Get File Content" action.


The Flow that I was building would look something like this


The request body is parsed using the Parse JSON action and the values can be used in the "Get File Content" and the "Create file" actions.

Ideally when the source and target are pre-determined, the flow looks like below.


Now in the Get File content action, the File Identifier is not the same as File path although it looks like it in the UI. We will see this in the upcoming steps.

The request body that we have sent through the HTTP request looks like below. It has all the data that we have used in the two file actions above.


So now we use these values in the "Get File content" and "Create file" actions.


Simple ! but when I execute the Flow, I keep running into an error in the Get File Content action.

 "message""The response is not in a JSON format.",
 "innerError""The resource you are looking for has been removed, had its name changed, or is temporarily unavailable."


To check the "identifier" value, I used the "Get Item" action


So with the identifier value, the Flow worked without any error ! The output of the Compose action shows the identifier value


If you notice the "Get File Content" action, we need to input the "File Identifier" and that is why the path that we used from request body did not work.

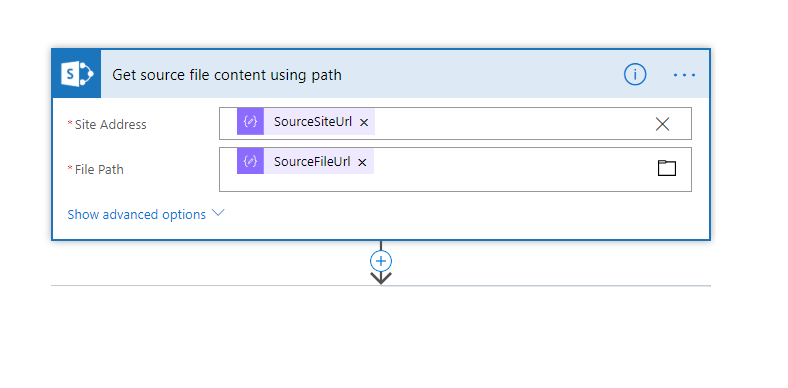
Then I discovered there is already an action - "Get File Content using path" to directly use the path that we are getting in the HTTP request body.


OR

Since the identifier is encoded, we can encode the "SourceFileUrl" that we have from the request body and use it in the Get file content action. 

However if you notice, the identifier returned by the "Get Item" action, the spaces are encoded as "%2b" ie "+" and "encodeUriComponent" expression will simply encode the spaces as %20

Using the Get File content using path action is clearly simpler option


encodeUriComponent(body('Parse_JSON')['SourceFileUrl'])


Tuesday 18 September 2018

Copy SharePoint modern site page along with content

Being able to copy a modern site page along with the content and layout enables us to use page templates in a SharePoint modern site. In a scenario where we want to create multiple site pages with a defined template, this functionality comes very handy. For instance, you can create a news page with all the sections and required web parts laid out on it and treat it as a page template to be used to create pages on demand.

For testing purpose, I placed a few web parts on the page template to see if they get copied over correctly and the following web parts worked well. You can try the functionality with other web parts to see if it fits your requirement.

  • Custom SPFx webpart
  • Recent Documents
  • People
  • Quick Links
  • Text
  • Embed
  • Bing Maps

Copying works within the site and also to a different site. When copying a page with custom SPFx web part to a different site, the web part solution must be installed on the target site.

Here is the sample code. It extracts the HTML content and title from the source page and adds the content to the "CanvasContent1" field of the target page. The Code uses PnP Core library - "SharePointPnPCoreOnline" nuget package.

Replace the placeholders in the code below.


Friday 10 August 2018

Bulk upgrade SPFx solution in multiple site collections using Microsoft Flow

I was recently working on an assignment where we set up an automated Site Collection provisioning process and developed several SPFx webparts. Each of the newly provisioned site collection would have these SPFx web parts provisioned on the pages of the site.

In the web part development process, we re-deployed the solution several times after the initial deployment. This was for the two scenarios below.


Changes made to the already deployed web parts :


When changes are made to the existing web parts which are already deployed to Site collection pages, the process of making updates available to these web parts is easy. Just update the SPPKG file in the App Catalog and replace the web part bundle files with the new build. Once this is done, the web parts in all the sites where the solution is deployed would get the updated functionality


New webparts added to the solution


If you have added new web parts to your SPFx project since the last release, the above process won't make these web parts available in the site collections where the solution was already installed.
In this case, we need to 

  • Increment the solution package version number
  • Redeploy the SPPKG file to App Catalog 
  • Update the web part bundle files in the CDN location 
  • UPGRADE the solution in the site collections.


When we have tens or hundereds of site collections where we need to upgrade the solution, manual upgrade is definitely not an option. We can automate this with a PnP PowerShell script using the "Update-PnPApp" command. 


https://docs.microsoft.com/en-us/powershell/module/sharepoint-pnp/update-pnpapp?view=sharepoint-ps

In our case, the list of all the provisioned site collections was available in a SharePoint list column (part of provisioning process where users request for new site.)

Microsoft Flow came to the rescue - Read all the list items and for each site in the list, execute a REST API call using the "Send an HTTP request to SharePoint" action.


ALM API Endpoint to upgrade the solution is (https://docs.microsoft.com/en-us/sharepoint/dev/apis/alm-api-for-spfx-add-ins)

"_api/web/tenantappcatalog/AvailableApps/GetById('<GUID>')/Upgrade"

The GUID of the solution can be found using the PnP PowerShell Command. Connect to a site collection and run the command : Get-PnPApp


Fast and easy !! Hope this helps.

Thursday 12 July 2018

Extract site classification report of Modern SharePoint sites using PnP-PowerShell

The Classification value of a SharePoint modern Team Site is not exposed through CSOM (at the time of writing this) unlike for the Communication Sites. This property for Team Sites exists on the Office 365 Group object (modern team site has a Office 365 Group connected to it) and can be extracted through a Graph API call.

The latest PnP-PowerShell release supports extracting classification value of a Team Site (Office 365 Group) using the Get-PnPUnifiedGroup command. This makes it very easy to extract a report of classification values of all the Team Sites in a tenant.

Below are a couple of scripts to export classification reports of all the modern sites - both Team and Communication sites in a tenant using PnP-PowerShell in just a couple of lines of code.

Make sure you have  2.28.1807.0 release installed before running the scripts. https://github.com/SharePoint/PnP-PowerShell/releases


Extract report for Team Sites :


To extract the classification report for Team Sites, we first need to connect to Microsoft Graph. Register an APP in https://apps.dev.microsoft.com and provide it appropriate permissions to be able to read Office 365 Group information. Also make sure you consent the app. Here is some documentation on how to do this


The report extraction might take some time as for each Office 365 Group, a separate call has to be made to the Graph API to fetch its classification value. This will change soon as PnP Core has been updated to the Latest Graph Version which supports extracting the classification value without a separate Graph call. Till this change is available, the report extraction process will be relatively slow :)


Extract report for Communication sites :


For communication sites, we first fetch all the Communication sites using the Get-PnPTenantSite command and filtering on the Template property. Then we get the Site object of each Communication Site and include the CLASSIFICATION property.

Execute the below command with the tenant admin account by replace the placeholders with relevant values in the below script


Wednesday 28 March 2018

Microsoft Flow : Custom response summary with user comments in Approval action

Flow approvals are really great to implement simple business processes. With the "Start an approval" action, we can carry out two kinds of approvals

1) Anyone from the assigned list
2) Everyone from the assigned list.

With the "Everyone from the assigned list", each of the assigned user is sent a request to approve or reject. Consider a scenario where you send a request to 2 users for approval. The first user approves however, the second user rejects the request. In this case, the final response of the approval step is "Rejected".

You might want to know which user approved and which rejected the request along with their feedback. There is a way to do that in Flow, by using the "Response Summary" value that comes with the output of the approval step.

Drawback :

With this value, comments of each user are not captured in the response summary.


Here, we can create our custom response which also includes the comments sent by the individual
user while approving or rejecting the request


If the response is rejected (or approved) based on where you want to configure the response summary


- We loop the "Responses" value and for each response, we form a summary of the individual response using "IndividualApprovalData" compose action.

- Notice that the individual "Comments" are available now

- Response : We have used the "Approver response" value and not the "Response" value. Response value gives the overall response of the action.

- We have used a custom expression to format the date

             formatDateTime(items('Apply_to_each')?['requestDate'],'MM/dd/yyyy hh:mm:ss')
            formatDateTime(items('Apply_to_each')?['responseDate'],'MM/dd/yyyy hh:mm:ss')

- Leave some space at the bottom of each response in the compose action


- The "ResponseSummary" compose action joins all the individual responses using the below expression

Join(outputs('IndividualApprovalData'), '')

The custom summary looks as below


Wednesday 21 February 2018

Azure AD B2B self-service registration - Register and Update a guest user using Graph API

Azure B2B capabilities give organizations the ability to provide external users (from partner organizations/ contractors etc) access to their data safely. This means that an External user can be added as a "Guest User" in an organization's Azure AD and this identity can be used to provide access to SharePoint online, Office 365 Groups etc.

An external user can be added to an Azure AD as a guest user using an E-mail address. An invitation email is sent out to the user to join the inviting tenant. This email ID can be of a user from another Azure AD, or a Microsoft Account or a personal/work ID which is not in an Azure AD.

In case the user is in another Azure AD, a password reset is not required for the user on accepting the invitation. User's main identity remains in the origin tenant and the user can continue to use the same set of credentials while accessing the inviting tenant. When the external user leaves their own organization and their account gets disabled, the access to inviting tenant also gets disabled automatically.

If the E-mail is a personal one, a new identity is created in the inviting tenant when the user accepts the invitation and creates a password. Here is some useful documentation to read through

https://docs.microsoft.com/en-us/azure/active-directory/active-directory-b2b-what-is-azure-ad-b2b

https://docs.microsoft.com/en-us/azure/active-directory/active-directory-b2b-faq


Guest users can be registered through the Azure Portal or using the Graph API. Being able to send guest user invitations through the Graph API opens the possibility of creating self-service registration portals for guest users.

In this post we are going to walk through the process of

1) Sending guest user invite through Graph API

2) Updating the guest user's profile as soon as the the invitation email is sent - This makes sure that the basic user information is available in the inviting tenant. This helps in keeping data available for building People directory etc.


Self service registration can be implemented as a simple ASP.net MVC web page where user provides the basic information such as

- First Name
- Last Name
- Email address
- Company
- Contact number etc

Rules/validations can be applied on the registration form as desired to make sure that only users from intended email domains are allowed to register as guest users.

In this post, we use App credentials and Graph API (GraphServiceClient) to send email invites to the guest users. Head over to https://apps.dev.microsoft.com to register an app that can call Graph API.

Permissions required for this app to send email invites are : User.Invite.All, User.ReadWrite.All, Directory.ReadWrite.All


First we authenticate and get the GraphServiceClient instance to work with Microsoft Graph using app credentials


Once we have the GraphServiceClient, create an "Invitation" objects and send the invite

The invitation object accepts

Email address of the Guest user
Display name with which the guest user will be registered in the Azure AD
- Redirect UI - this is the URL where the user will be redirected when the invitation is accepted - InvitedUserMessageInfo object where we can set a customized message to be send in the email

The call to send user invitation returns an Invitation object in response.


Once the invite is sent, the user gets registered in the Azure AD. We can update the user properties in Azure AD to make sure that when the user accepts the invitation, the basic information is available in the Azure AD.


The invitation object returned as a response of sending an invite also returns a Azure AD USER object. This object can be used to set the user profile properties and update it back in Azure AD.


Friday 5 January 2018

Use Azure Functions as remote event receiver in SharePoint

SharePoint webhooks are a new way of building event receivers for SharePoint. However, webhooks are only enabled for SharePoint list items at the time of writing this. https://docs.microsoft.com/en-us/sharepoint/dev/apis/webhooks/overview-sharepoint-webhooks

Recently I was required to write a event receiver for ListAdded event in a web. I decided to try and use Azure functions to achieve this instead of writing the traditional provider hosted app remote event receiver. Came across this great post  from Sergei Sergeev for reference.

Lets create a ListAdded event receiver using Azure Functions.

To Begin with, create a Azure Function project in Visual Studio and created a Function App in Azure through the Azure Portal. Add a function to the function app and select the HTTP trigger type of function since the event receiver needs to send the event payload to a HTTP endpoint. Publish your Azure function to the function app created through Azure Portal. The Azure function is now ready to receive events from SharePoint.

The Azure Function will have an endpoint. This can be fetched by clicking on the function in the Azure portal and clicking on the Get function URL link


The URL will look something like this :

https://<functionAppName>.azurewebsites.net/api/<AzureFunctionName>

The domain may be different based on your tenant configurations. We need the domain part of this URL in the next steps.

Now we need to register a event receiver on a WEB in SharePoint. We will use a simple console app for this. The console app will use SharePoint App credentials. So, head over to the "/_layouts/AppRegNew.aspx" page in your site and register a new app. Remember to provide the domain of this app as the domain of your event receiver Azure function noted above. We will need this in the future. Provide full control permissions to this APP on the site collection.


Here is the code for installing an event receiver on the web. Replace receiverAzureFuncUrl, webUrl, ClientID and ClientSecret and run the console app. The console app users PnP Sites Core to get app-only client context.


Now the Azure function is ready to receive event of a list being added to the WEB. We need one more thing in our code and that is "TokenHelper". This is used to validate the context token received in the event payload and communicate with SharePoint through from within Azure function (which is our event receiver). I created a class library project in my Azure Function solution in Visual Studio and installed the "AppForSharePointOnlineWebToolKit" nuget package. Add a reference of this class library in your Azure Function APP project


NOTE : I had to add the reference of the DLL of this class library. Adding the project reference made the publish operation to fail.


Since the token helper fetches the ClientID and ClientSecret from webconfig, modify the code to fetch these values from the Azure Function APP settings.


Change the code of your Azure function to handle the incoming request from List Added event. This code reads the event payload and parses the XML to fetch the values that are of our interest. You can log the entire XML and see what are the values received through the Event payload. Once we have the "ContextToken" string, we can Validate the token and also get the client context of the site using "TokenHelper".  The "GetClientContextWithContextToken" method internally validates the token as well.


Hope this helps !