Showing posts with label Office 365. Show all posts

Tuesday, 18 September 2018

Copy SharePoint modern site page along with content

Being able to copy a modern site page along with the content and layout enables us to use page templates in a SharePoint modern site. In a scenario where we want to create multiple site pages with a defined template, this functionality comes very handy. For instance, you can create a news page with all the sections and required web parts laid out on it and treat it as a page template to be used to create pages on demand.

For testing purpose, I placed a few web parts on the page template to see if they get copied over correctly and the following web parts worked well. You can try the functionality with other web parts to see if it fits your requirement.

  • Custom SPFx webpart
  • Recent Documents
  • People
  • Quick Links
  • Text
  • Embed
  • Bing Maps

Copying works within the site and also to a different site. When copying a page with custom SPFx web part to a different site, the web part solution must be installed on the target site.

Here is the sample code. It extracts the HTML content and title from the source page and adds the content to the "CanvasContent1" field of the target page. The Code uses PnP Core library - "SharePointPnPCoreOnline" nuget package.

Replace the placeholders in the code below.


Thursday, 12 July 2018

Extract site classification report of Modern SharePoint sites using PnP-PowerShell

The Classification value of a SharePoint modern Team Site is not exposed through CSOM (at the time of writing this) unlike for the Communication Sites. This property for Team Sites exists on the Office 365 Group object (modern team site has a Office 365 Group connected to it) and can be extracted through a Graph API call.

The latest PnP-PowerShell release supports extracting classification value of a Team Site (Office 365 Group) using the Get-PnPUnifiedGroup command. This makes it very easy to extract a report of classification values of all the Team Sites in a tenant.

Below are a couple of scripts to export classification reports of all the modern sites - both Team and Communication sites in a tenant using PnP-PowerShell in just a couple of lines of code.

Make sure you have  2.28.1807.0 release installed before running the scripts. https://github.com/SharePoint/PnP-PowerShell/releases


Extract report for Team Sites :


To extract the classification report for Team Sites, we first need to connect to Microsoft Graph. Register an APP in https://apps.dev.microsoft.com and provide it appropriate permissions to be able to read Office 365 Group information. Also make sure you consent the app. Here is some documentation on how to do this


The report extraction might take some time as for each Office 365 Group, a separate call has to be made to the Graph API to fetch its classification value. This will change soon as PnP Core has been updated to the Latest Graph Version which supports extracting the classification value without a separate Graph call. Till this change is available, the report extraction process will be relatively slow :)


Extract report for Communication sites :


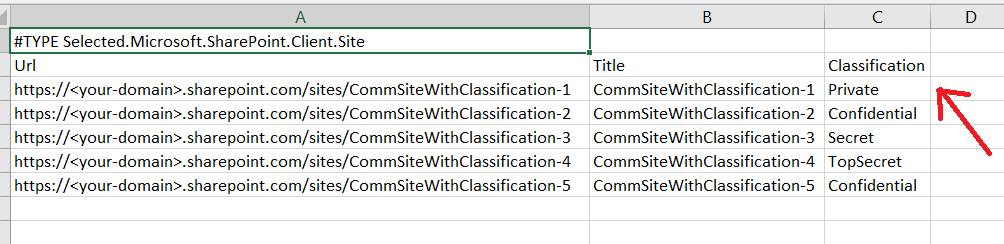
For communication sites, we first fetch all the Communication sites using the Get-PnPTenantSite command and filtering on the Template property. Then we get the Site object of each Communication Site and include the CLASSIFICATION property.

Execute the below command with the tenant admin account by replace the placeholders with relevant values in the below script


Wednesday, 28 March 2018

Microsoft Flow : Custom response summary with user comments in Approval action

Flow approvals are really great to implement simple business processes. With the "Start an approval" action, we can carry out two kinds of approvals

1) Anyone from the assigned list
2) Everyone from the assigned list.

With the "Everyone from the assigned list", each of the assigned user is sent a request to approve or reject. Consider a scenario where you send a request to 2 users for approval. The first user approves however, the second user rejects the request. In this case, the final response of the approval step is "Rejected".

You might want to know which user approved and which rejected the request along with their feedback. There is a way to do that in Flow, by using the "Response Summary" value that comes with the output of the approval step.

Drawback :

With this value, comments of each user are not captured in the response summary.


Here, we can create our custom response which also includes the comments sent by the individual
user while approving or rejecting the request


If the response is rejected (or approved) based on where you want to configure the response summary


- We loop the "Responses" value and for each response, we form a summary of the individual response using "IndividualApprovalData" compose action.

- Notice that the individual "Comments" are available now

- Response : We have used the "Approver response" value and not the "Response" value. Response value gives the overall response of the action.

- We have used a custom expression to format the date

             formatDateTime(items('Apply_to_each')?['requestDate'],'MM/dd/yyyy hh:mm:ss')
            formatDateTime(items('Apply_to_each')?['responseDate'],'MM/dd/yyyy hh:mm:ss')

- Leave some space at the bottom of each response in the compose action


- The "ResponseSummary" compose action joins all the individual responses using the below expression

Join(outputs('IndividualApprovalData'), '')

The custom summary looks as below


Wednesday, 21 February 2018

Azure AD B2B self-service registration - Register and Update a guest user using Graph API

Azure B2B capabilities give organizations the ability to provide external users (from partner organizations/ contractors etc) access to their data safely. This means that an External user can be added as a "Guest User" in an organization's Azure AD and this identity can be used to provide access to SharePoint online, Office 365 Groups etc.

An external user can be added to an Azure AD as a guest user using an E-mail address. An invitation email is sent out to the user to join the inviting tenant. This email ID can be of a user from another Azure AD, or a Microsoft Account or a personal/work ID which is not in an Azure AD.

In case the user is in another Azure AD, a password reset is not required for the user on accepting the invitation. User's main identity remains in the origin tenant and the user can continue to use the same set of credentials while accessing the inviting tenant. When the external user leaves their own organization and their account gets disabled, the access to inviting tenant also gets disabled automatically.

If the E-mail is a personal one, a new identity is created in the inviting tenant when the user accepts the invitation and creates a password. Here is some useful documentation to read through

https://docs.microsoft.com/en-us/azure/active-directory/active-directory-b2b-what-is-azure-ad-b2b

https://docs.microsoft.com/en-us/azure/active-directory/active-directory-b2b-faq


Guest users can be registered through the Azure Portal or using the Graph API. Being able to send guest user invitations through the Graph API opens the possibility of creating self-service registration portals for guest users.

In this post we are going to walk through the process of

1) Sending guest user invite through Graph API

2) Updating the guest user's profile as soon as the the invitation email is sent - This makes sure that the basic user information is available in the inviting tenant. This helps in keeping data available for building People directory etc.


Self service registration can be implemented as a simple ASP.net MVC web page where user provides the basic information such as

- First Name
- Last Name
- Email address
- Company
- Contact number etc

Rules/validations can be applied on the registration form as desired to make sure that only users from intended email domains are allowed to register as guest users.

In this post, we use App credentials and Graph API (GraphServiceClient) to send email invites to the guest users. Head over to https://apps.dev.microsoft.com to register an app that can call Graph API.

Permissions required for this app to send email invites are : User.Invite.All, User.ReadWrite.All, Directory.ReadWrite.All


First we authenticate and get the GraphServiceClient instance to work with Microsoft Graph using app credentials


Once we have the GraphServiceClient, create an "Invitation" objects and send the invite

The invitation object accepts

Email address of the Guest user
Display name with which the guest user will be registered in the Azure AD
- Redirect UI - this is the URL where the user will be redirected when the invitation is accepted - InvitedUserMessageInfo object where we can set a customized message to be send in the email

The call to send user invitation returns an Invitation object in response.


Once the invite is sent, the user gets registered in the Azure AD. We can update the user properties in Azure AD to make sure that when the user accepts the invitation, the basic information is available in the Azure AD.


The invitation object returned as a response of sending an invite also returns a Azure AD USER object. This object can be used to set the user profile properties and update it back in Azure AD.


Friday, 5 January 2018

Use Azure Functions as remote event receiver in SharePoint

SharePoint webhooks are a new way of building event receivers for SharePoint. However, webhooks are only enabled for SharePoint list items at the time of writing this. https://docs.microsoft.com/en-us/sharepoint/dev/apis/webhooks/overview-sharepoint-webhooks

Recently I was required to write a event receiver for ListAdded event in a web. I decided to try and use Azure functions to achieve this instead of writing the traditional provider hosted app remote event receiver. Came across this great post  from Sergei Sergeev for reference.

Lets create a ListAdded event receiver using Azure Functions.

To Begin with, create a Azure Function project in Visual Studio and created a Function App in Azure through the Azure Portal. Add a function to the function app and select the HTTP trigger type of function since the event receiver needs to send the event payload to a HTTP endpoint. Publish your Azure function to the function app created through Azure Portal. The Azure function is now ready to receive events from SharePoint.

The Azure Function will have an endpoint. This can be fetched by clicking on the function in the Azure portal and clicking on the Get function URL link


The URL will look something like this :

https://<functionAppName>.azurewebsites.net/api/<AzureFunctionName>

The domain may be different based on your tenant configurations. We need the domain part of this URL in the next steps.

Now we need to register a event receiver on a WEB in SharePoint. We will use a simple console app for this. The console app will use SharePoint App credentials. So, head over to the "/_layouts/AppRegNew.aspx" page in your site and register a new app. Remember to provide the domain of this app as the domain of your event receiver Azure function noted above. We will need this in the future. Provide full control permissions to this APP on the site collection.


Here is the code for installing an event receiver on the web. Replace receiverAzureFuncUrl, webUrl, ClientID and ClientSecret and run the console app. The console app users PnP Sites Core to get app-only client context.


Now the Azure function is ready to receive event of a list being added to the WEB. We need one more thing in our code and that is "TokenHelper". This is used to validate the context token received in the event payload and communicate with SharePoint through from within Azure function (which is our event receiver). I created a class library project in my Azure Function solution in Visual Studio and installed the "AppForSharePointOnlineWebToolKit" nuget package. Add a reference of this class library in your Azure Function APP project


NOTE : I had to add the reference of the DLL of this class library. Adding the project reference made the publish operation to fail.


Since the token helper fetches the ClientID and ClientSecret from webconfig, modify the code to fetch these values from the Azure Function APP settings.


Change the code of your Azure function to handle the incoming request from List Added event. This code reads the event payload and parses the XML to fetch the values that are of our interest. You can log the entire XML and see what are the values received through the Event payload. Once we have the "ContextToken" string, we can Validate the token and also get the client context of the site using "TokenHelper".  The "GetClientContextWithContextToken" method internally validates the token as well.


Hope this helps !

Monday, 30 October 2017

Work with Multi-value lookup fields in Microsoft Flow and SharePoint - Part 2

Part I of this post explains a couple of limitations of working with Microsoft Flow and SharePoint Multi-value lookup field.

Work with Multi-value lookup fields in Microsoft flow and SharePoint - Part 2

To overcome the challenge I decided to use SharePoint REST API to retrieve the field values. As you may already know, flow provides HTTP Trigger action which we can use to call the SharePoint REST API. The idea is to get an access token and retrieve the values through this HTTP trigger action. There are two great posts that helped me get an Access token, SharePoint scribblings and Shantha Kumar's blog

To start with, register an app in your SharePoint site through the "_layouts/15/AppRegNew.aspx" page. Provide the appropriate permissions so that it can access the multi-value lookup field data.

You'll have the client ID and client secret of the app. Also find out the TenantID of the tenant you are working on.

We create a new flow which is triggered when a new Item is created. Initialize the variables TenantID, ClientID, ClientSecret and a placeholder variable for AccessToken.


Next, add a HTTP trigger action, to get the access token


The body of this request is of the format

grant_type=client_credentials&client_id=<Client-ID>@<Tenant-ID>&client_secret=<Client-Secret>=&resource=00000003-0000-0ff1-ce00-000000000000/<tenantdomain>.sharepoint.com@<Tenant-ID>


Run the flow once till this step and see the history of the execution. Copy the body of the response. We will need it in the next steps.

Now we return to our flow and add a parse JSON action. Provide the "Content" as the body of the response from the previous HTTP trigger action. Use the body value copied in the previous step and paste it in the "Use sample payload to generate schema". This provides parse JSON action a sample format of the JSON that must be parsed.


Once this step executes, we are ready to use the access token. Next, use another HTTP trigger action to call SharePoint REST endpoint (here I have used a hard coded item ID) and retrieve the multi-value lookup field values. Along with the Title, you may also want to retrieve the ID of the looks. That might help you query other lists where these values may have been used.


The results show the lookup values that were selected for the item.


Now, we can then use these values as we would like to


Work with Multi-value lookup fields in Microsoft Flow and SharePoint - Part 1

I was recently working on a requirement to implement Microsoft Flow on a list that had a multi-value lookup field in it. The requirement was to fire a Flow when an item is created in the list and run a loop for each of the value selected in the multi-value lookup field.

At the time of writing this article, multi-value look-up fields are not supported in Microsoft Flow. This means that I could not straight away use the values from this multi-value look-up field and apply a loop.

If you would like to jump to how we can retrive the multi-value lookup column in Flow, here is the second part of the post

Work with Multi-value lookup fields in Microsoft flow and SharePoint - Part 2

The setup :

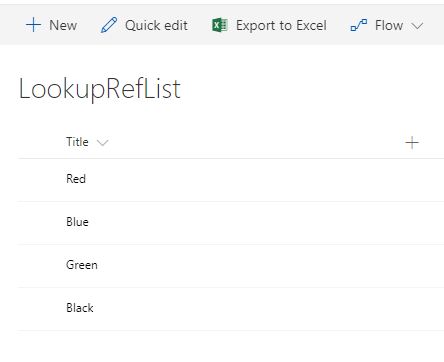
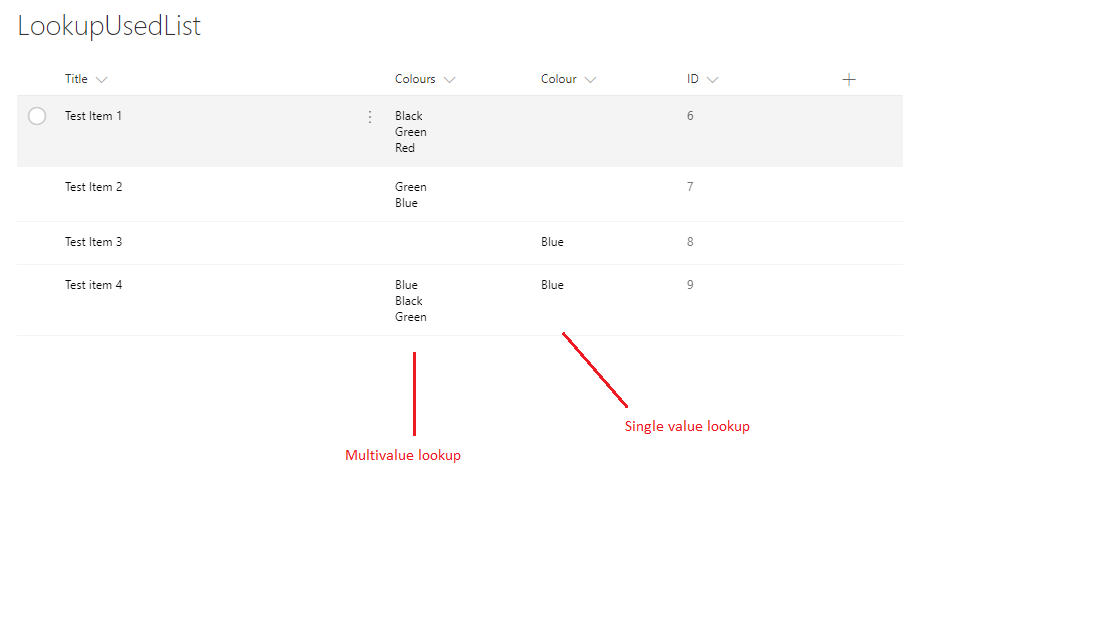
For this post, I am using a very simple setup, a "LookupRefList" with some 'Colours'  in it and another list "LookupUsedList" which has two fields which lookup data from "LookupRefList"

1) Colour : Single value lookup (just to show the difference in Flow values)
2) Colours : Multi-value lookup


Flow with a single-value lookup field :

We can retrieve values from a single value lookup straight away

Flow setup :


Result :


Multi Value Lookup field

When we to fetch the multi-value column in Microsoft flow, the flow runs successfully, however, when you try to see the execution log, you see an error


Click to see the log


We cannot straight away use the multi-value look-up  in a apply to each loop.


In the next part of the post, we retrieve multi-value lookup field values.

Work with Multi-value lookup fields in Microsoft flow and SharePoint - Part 2

Monday, 8 May 2017

Create a simple timer job for SharePoint online using Microsoft Flow

Creating scheduled jobs for SharePoint on-premise environment was pretty straight forward. Develop a timer job and deploy it to the farm and you are done. With SharePoint online, there are a few different ways to develop scheduled jobs, one of which is to create a Azure web job which talks to SharePoint data and runs the required tasks.

However, some organizations/small businesses do not have Azure subscription or the technical ability/developers to develop and deploy an Azure web job. Sometimes, the required functionality of the scheduled job is not too complex to create a Azure web job.

With Microsoft flow, we can easily create timer job-like features that run on a schedule and carry out a few simple tasks.I say simple because when I set out to explore several different scenarios where a Microsoft flow timer jobs can be used for a SP list, I found that Flow lacks several features. While it provides a lot of connectors, triggers, actions and conditions, as developers or power users there are a lot of actions/trigger/functionalities we need that are missing. At the end of this post I'll explain in brief about a scenario I tried to implement using Flow however it did not work out well.

Sample Timer Job

Meanwhile I decided to develop a simple timer job for asset request and procurement process. The job runs on a schedule and moves the "Approved" asset requests from requests list to a separate "Procurement" list. In this post we will see how to

1. Get items from SharePoint list
2. Filter SharePoint list items using a ODATA filter.
3. Loop on the list items
4. Create and delete list item

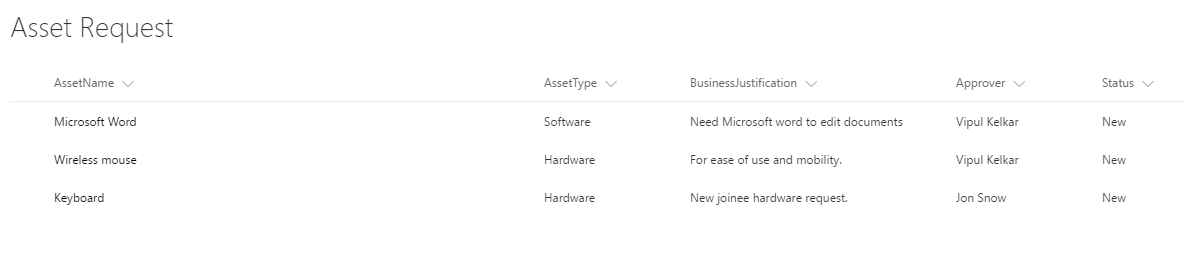
I have created two lists that will be used in this flow. Asset Request list with NEW and APPROVED requests (choice column) and a Asset Procurement list which will be empty initially.


Navigate to Flow from Office 365 and create a new flow from blank template.


Give your flow a name. The first step we add here is a Schedule action. This will enable us to define a schedule for our process to run periodically.


The schedule can be set based on Minutes/Hours/Days etc as given below


Now, we will retrieve items from Asset Request list. Add a new action and select SharePoint


Select the Get items action


Configure the Get items action. We retrieve the list items from Asset Request list and filter by only the items which are Approved


Now that we have the approved items, the next step is to iterate through the items and create these items in the Asset Procurement list. To add the Loop operation, click "Add an apply to each" action as shown below


We need to tell the loop action which data source it should iterate. Select the 'value' as indicated below. Notice the data source label is the previous action "Get items"


We need to perform two actions now,

1. Create item in Asset Procurement list
2. Delete Approved items from the Asset request list

Add an action to create a list item in SharePoint.


Select the site and list in which the items must be created and indicate the value for each column in target list. Notice that the data source from where we select the value for the item to be created is coming from our previous Get Items action. So the values coming from the Asset Request list will be added to the Asset procurement list.


Now we create a new action to delete the Approved items from the Asset request list.


We need to delete item from the Asset request list. So select the source carefully. Since we have retrieved items from the Asset request list through Get Items action, select the ID from that data source as shown below.


The complete list flow look as shown below.


After the flow execution, our lists look like :


Limitated functionalities :

The limitation or issues mentioned here are something that I noticed at the time of writing this post. As and when updates are pushed to Microsoft Flow, I will try and update this post as well :)

While creating a SharePoint list item through flow, I noticed that we cannot add values to People column and Choice column as of now. There are a couple of more types of columns which are not supported.

https://powerusers.microsoft.com/t5/Building-Flows/Create-Item-Sharepoint-list-fields-missing/td-p/8930

Also, the SharePoint get items action only accepts Odata filter and does not support the Odata Select operation.

There might be several other actions/triggers which you may need to implement your business requirement but are not yet available in Flow.

Hope this helps !!

Sunday, 12 March 2017

Office 365 Groups ecosystem Part 4 : External users and group email settings


Office 365 Groups ecosystem Part 1 - The Basics
Office 365 Groups ecosystem Part 2 - Office 365 Group Team site and permissions
Office 365 Groups ecosystem Part 3 - Create groups from several UI options


External users can be added as "Guests" to the Office 365 Group. Here are the details of what guests can and can't do in the group. Only users outside the organizations can be added as "Guests", users that are a part of organizations can be invited and added as regular members.


The external user receives an email and is registered in Office 365 if the user wishes to collaborate in the group.

Email settings for Office 365 Groups :

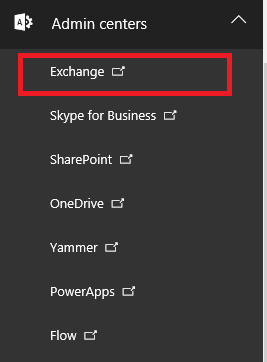
Office 365 Group email settings can be administered from the Exchange admin. Navigate to the Office 365 Admin center -> Exchange Admin and Groups


This will show you the groups in Exchange, Your Office 365 groups will also be displayed here. Double click on the group or select and click the Edit icon to change the settings of the group in detail


Can external users send emails to Office 365 groups ?


By default, the users outside your organization cannot send email to the Group mailbox. You can edit this setting from the general tab as shown.