Tuesday, 21 February 2017

Notes from SharePoint online migration planning

There are a lot of good blog posts out there which describe the things you should consider while migrating your SharePoint on-premise sites to Office 365-SharePoint online. What you will learn is that the most important step in any SharePoint migration is the planning, and yes, it is !
For planning SharePoint migration, you need a lot of information about your source environment so that the planning and execution of the migration can be as smooth as possible. From my experiences of SharePoint online migrations, I’ll try to jot down some notes which might be useful in planning migration and help you prepare for the dependencies before the actual migration starts.

Generate source inventory reports :


Most of the migration tools in the market provide a separate tool or utility that can generate inventory reports and provide you an insight into the source SharePoint environment. If you are not using a migration tool (which is pretty rare) or find that the reports generated by the tools are not in a format you want, you can always write custom PowerShell scripts to export reports with the details you want. A few of these tools are not free and that can also be a deciding factor to write your own scripts. I have found CSV reports to be very handy because it enables you to sort, filter, categorize and present data very easily which is very important in planning phase of the migration.

Here is some of the information you would want from your source SharePoint environment inventory reports to plan the migration

1. Size of the site collections:

This is probably the most important piece of data you want from the source enviornment for planning. This tells you approximately how much content you are going to migrate to Office 365 and helps in planning and sequencing the migration of site collections and define a schedule.

2. Number of subsites in each site collection :

There is a boundry or a ‘recommended’ boundry to the number of subsites you can create in a site collection in SharePoint online. https://support.office.com/en-us/article/SharePoint-Online-software-boundaries-and-limits-8f34ff47-b749-408b-abc0-b605e1f6d498

If you are exceeding that limit, you may want to consider restructuring the subsites in different site collections,

3. List item count/Large lists :

Sites with large lists may take more time to migrate. Knowing the list item counts in the source lists and libraries will help you plan/sequence the migration of sites.

4. Item versions :

In SharePoint environment without any governance setup, you may come across items that have many versions. I have seen documents with 2500+ versions with each more than 1 MB in size. Now that is a lot of data, some of which might be unecessary. During the planning phase, extract information about such documents having more than ‘X’ number of versions so that these can be cleaned up in the source site itself and then migrated to SharePoint online.

5. Site last modified :

There may be sites in your source environment which have not been modified for years. If the source is a SharePoint 2007 environment, there is a possibility that a few sites may not have been modified for more than 5-6 years. Having information about such sites can help you get in coversation with the business users and decide if the these sites must be archived and not migrated to the SharePoint online environment.

6. In-use custom features :

If some custom features are activated on site collections/subsites, there might be some custom functionality (fields, content types, webparts etc) in use in that site. You should know about such sites to plan the remediation/re-development of such custom functionalities in SharePoint online or atleast to anticipate what are the possible issues in the target migrated sites if these customizations are not migrated

7. Lookup columns:

Most of the migration tools handle look up columns pretty well but it is good to know the list of lookup columns in a site so that these can be tested thoroughly post-migration.

Plan for Checked-out files:


There are situations where users have uploaded files in document library but never checked in even a single version of the file. These files can be typically viewed from "Manage Checked-out files" in the document library settings.

Extract a report of such files through your inventory scripts which will enable you to communicate with the business to check-in the files well in advance of the migration execution phase and ensure the migration of the latest version of the files.

User mapping :


Identify your user migration scenarios -
  • Are the users being migrated to a different domain than the source?
  • If no, are the users getting migrated as-is to SharePoint online through the migration tool of your choice ?
  • Are the Distribution lists and AD groups added to the source sites and are these DLs and groups available in the target AD ? If yes,are they getting migrated as-is using the migration tool of your choice ?

A pilot migration can help clearly understand if the user, distribution list and security group migration scenarios are working properly. If the as-is migrations are not working, you may need some sort of user mappings from source user IDs to target user IDs. Knowing whether user mapping is required or not before the migration execution starts can save you a lot of time
Most of the migration tools allow us to import user mappings through a CSV/XML file. All the information you need (users list from on-premise AD, distribution list names and email IDs) can be collected and user mappings can be created in desired format before the migration execution begins.


Use the SharePoint online migration API


The default way migration tools connect and migrate content to SharePoint online tenant is through CSOM. In case where we want to migrate lists or libraries with large number of items, the CSOM approach is slower since the CSOM calls are throttled.
Most of the migration tools now support this. So know your tool and understand how you can leverage this option because this approach has greater migration throughput then the CSOM approach.

Take only what you need


A SharePoint environment with no governance or archival mechanism in place can have a lot of unecessary data stored over the years. Since you are paying for the amount of storage that you use in SharePoint online, its best to clean-up the sites and data in the source environment and migrate only relevant data. Also, consider point # 4 and 5 from above for this.


Wednesday, 18 January 2017

Configure Advanced people search in SharePoint online

In a SharePoint online tenant, you can find a search center already provisioned at the URL https://<Tenant>.sharepoint.com/search . This search center has a page for advanced search that can be found in the pages library - "Advanced,aspx" which facilitates users to search specifically for content in advanced mode. There can be a scenario where you want to provide your users with an advanced people search interface. This is not available Out of the box. In this post, we will walk through the steps to configure advanced people search for your SP online tenant.

These configurations might also work for SharePoint 2013 on premise, however I have only tested this in SP Online.

In a nutshell we are going to perform the following steps

1) Create a new advanced search page.
2) Edit the advanced search web part on that page to remove unwanted fields.
3) Add properties relevant to people search in the advanced search drop down.
4) Make the advanced search webpart navigate to people results.
5) Links this new advanced people search page to the people search web part.

So lets start. First we check if the "Advanced Search" page layout is available when we create new pages in the site.

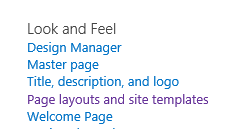
Navigate to the search center -> Site Settings -> Page layouts and site templates (Under look and feel section)


Add the Advanced search page layout to the available page layouts. Navigate to the pages library and create a new page with this page layout


You will see a default advanced search web part on the page. There are a few properties which are populated by default in the drop down. There are also a few controls and language filter displayed. These are for the purpose of content search but we will get rid of all that in the upcoming steps


Now edit the page and edit the advanced search webpart. From the Search Box section of web part properties, un-check the check boxes as shown below


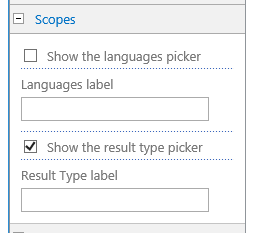
Also, from the scopes section, un-check the languages check box.


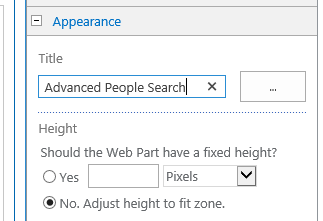
From the Appearance section, change the title of the web part to indicate that it is an advanced people search webpart.


Apply the changes, the extra controls which we did not need are now hidden. Since the properties in the drop down box are relevant for content and not to search people, we will modify these properties and add relevant properties such as "First Name", "Last Name", "Department" etc


Edit the web part and open the properties section from the button as indicated below. It will open a dialog box and display XML text


Copy the content and paste it in your favorite text editor, Look for the <PropertyDefs> node and the <PropertyRef> node. To search for people, we should have relevant properties in the drop down box for users to search on, For this, we need to add the Managed Properties in the drop down box.

Add a new <PropertyDef> node in inside the <PropertyDefs>.

Name - This is the name of the managed property
Type - This is the type of the managed property.
DisplayName - Specify the display name of the property in drop down.

Once this is done, add a <PropertyRef> node as shown in the image below. This will be reference to the property def we just added above.


Now copy and save the content in the "Properties" section of the web part and apply the changes to the web part. Once the changes are applies, the properties drop down will display our new property


Similarly you can add more managed properties and also remove the unwanted properties by by adding or removing the <PropertyDef> and <PropertyRef> nodes as desired

My properties dropdown looks something like this after adding FirstName, LastName and Department properties.


We are almost there, Now, since the advanced search webpart by default searches for content, it navigates to "/Pages/Reuslts.aspx" page to display content results when a keyword is searched. Since we want to search for people, we will make the webpart navigate to "/Pages/PeopleResults.aspx". To do this, edit the webpart and change the Results URL property from the "Miscellaneous" section.


Now when you search on a property in the advanced search web part, the people results will be displayed.


Search result -


I could not find a property to hide the "Result Type" drop down so this must be hidden through CSS or JavaScript


But how will users navigate to your new advanced people search page ? Easy. Open your PeopleResults.aspx page from the pages library and edit the people search web part. Enable the advanced link and add the name of the new advanced people search page.


You'll see the "Advanced" link enabled on the search web part.


Hope this helps !


"

Saturday, 14 January 2017

Change SharePoint online site language

As a SharePoint online site administrator, you can let your users display a site in language of their choice. Changing the display language of a site involves a couple of steps, both from the site administrator and also the user.

Site collection administrator steps:
To let users of your site use different language, you can change the available languages from the Site settings. Navigate to your site -> Site settings. Under the site administration section, select "Language settings"


This will show open a page that displays a bunch of languages.


Notice the text under Alternate language(s). Users will be able to change the site language from the languages that the site administrator makes available to the user. For now, I'll select HINDI here and click OK


Now, this will not have any effect on the site. The site will still be displayed in the default language. The administrator just made the site available in Hindi. Now, as a user, if I want to see the sites in Hindi, I need to modify a property in my user profile.

User profile language preference :

From the ribbon, click on your profile picture and click on "About Me"


Select "Update Profile"


Select the below option and click on


Click on Language and Region


From the preferences, select a language and click Add.


These are the language preferences of a user. I'll move Hindi the be my preference by using the little arrows beside the language.


Click on Save and close. It will display a dialog with information. Click OK.


You will notice that your profile page is shown in the language of your preference. Now navigate to the site where we made the language Hindi available to the users.


Monday, 14 December 2015

Property promotion and Programatically Copying documents with only required fields in SharePoint 2013.

Recently I was working on a requirement to copy documents between two site collections where the source and target document library had the same content type applied to them. The approach I took was to
- Get the source document library item
- Get the target folder where the document was to be copied
- Use the SPFolder.Files.Add() to copy the document.

Fairly simple ! The only thing I had to take care of was to copy only a specified set of field values (not all fields from content type) to the target file. (This was a part of the requirement !)

There is an overload of the ADD method that allows us to pass a Hashtable which will contain the fields that we want to copy over to the target file. So for example if I want to copy "Document Id" field of a document, I'll pass the property like this

Hashtable itemProperties = new Hashtable();
itemProperties.Add ("Document Id", "<VALUE>");


Now, though I passed only the required properties through a hashtable, all the field values of the content type were being copied. After a bit of head-scratching, I figured out that this scenario was not reproducible for a ".TXT" file but only for Microsoft Office files. This was because of SharePoint property promotion. What this basically does is when a document is added to a document library, the values of the fields in the list item for the document are added to the metadata properties of the document file and since the stream of the file was used to copy the document, the properties were getting transferred with it.

The property "ParserEnabled" of Web object allows SharePoint to know whether to retain all the properties when a file is copied/downloaded-uploaded.

https://msdn.microsoft.com/EN-US/library/microsoft.sharepoint.spweb.parserenabled.aspx

So to copy only the required properties, you can disable ParserEnabled property of the web, copy the document and then set it back again


But you would not want to set the ParserEnabled property to false permanently so of course you would set it back to true in the FINALLY block of your code :)

Hope this helps !

Tuesday, 3 November 2015

get_label() or .Label : Retrieve taxonomy column value using JSOM

This is going to be a short post about something I observed recently while working with Taxonomy field and JavaScript object model. While retrieving value of the Taxonomy field of a list item, we generally use the "get_label()" method.


This is the case if you have already referenced SP.Taxonomy.js in your code before fetching the list item. We generally do something like this


It is not necessary to have SP.Taxonomy.js referenced in your code in order to retrieve the Taxonomy field value. If you do not reference SP.Taxonomy.js, you need to use the ".Label" property which is returned with the list item to retrieve the label of the term.


So the next time you are tired of scratching your head trying to figure out why you are not able to retrieve the label using get_label(), check if you have referenced Taxonomy JS and use the appropriate method.

Cheers !